THIS PAGE HAS BEEN MOVED HERE:

Friday, March 28

Ways to Record Sound using a Personal Computer

This is a basic one.Before you can record sound using a personal computer. You need to have:

a. Sound card (decent one at least Soundblaster Audigy)
b. Audio mixer
c. Studio speakers
d. Cables (2)
e. Audio editing software( I am using Adobe audition 1.5)

Read this page for detailed explanation of PC audio recording factors.

Take note there are a lot of ways to record sound. I will show you different configurations and their strength and weaknesses:

Method 1: The most basic configuration


This is very basic, the instruments (could be anything) is plugged into the microphone/line-in input of the soundcard. The audio recording software in the personal computer takes charge in the recording process. And then the soundcard output is connected to the computer speakers for monitoring.

The advantages of this method is that it is very easy to setup. The disadvantages are:
a. Very noisy signal
b. Low amplitude or very weak signal.
c. Poor frequency response.

This is only recommended to record voice signals such as an amateur voice tape recording but this is not recommended for professional recording.

Method 2:
Using mixer on the instruments side:


Instruments can be connected first to the studio mixer thus conditioning the signal such as amplification and removing of noise. This is recommended for studio recording because the signals are now strong to be recorded and less noise.

Plus since the audio mixers are employed, it will have an excellent frequency response which is very essential for professional recording.

Although this method is great but it is not efficient enough as the next step.

Method 3: Using mixer to route all signals coming to it and from the computer.


This is the most efficient one, because all controls of the volume is on the mixer. In this setup, the instruments are feed to the mixer, the mixer then conditions the signal by using it's pre-amp features or some EQ then it is being feed finally to the computer audio recording software.

At the same time the audio recording software feeds out signal to the soundcard which then connects to another input in the mixer to control the volume.The mixer output then connects to the studio monitors/speakers to hear the signals being played. This is a very useful setup during multi-track recording and is the one I am using in my home studio.

Try to experiment other types of setup that fits your budget and your recording needs. But the method 3 is the most recommended method if you are into professional audio CD production.


NOTICE: TO LEAVE A COMMENT, PLEASE VISIT THE NEW URL OF THIS PAGE: http://www.audiorecording.me/ways-to-record-sound-using-a-personal-computer.html

Friday, March 14

Creating Realistic Stereo Image with Panning

Panning is how the instruments are arranged within the stereo image. By properly using this mixing feature can create a very realistic mix. Mixing engineer should mix tracks with a live sound stage/concert stage perspective such as shown below:


Vocals is always in the center because the band lead singer is the star of the show. At the back of the vocals is the bass player. Typically at the back of the bass player is the drummer. The band's two guitarist are on the left and the right. Although, different panning arrangement are possible for additional instruments (such a band with piano or others). But this concept illustrates the basic things on how to do panning in audio mixing to create a very realistic stereo image.

Live sound monitors for vocals and bass are placed up front facing the audience, so that fans can get a great feel of the vocals and the bass groove. On the left and right loud sound monitors are the guitars.

In the commercial audio production and using a recording software, panning can be controlled between -100 to +100. Where mostly -100 is the leftmost part of the stage and +100 is the rightmost part of the stage. Mixing from the real live stage perspective, a mixer can set:

a. Vocals to panning= 0 (center)
b. Kick drums = 0 (center)
c. Bass guitar= 0 (center)
d. 1st guitarist=75 (hard right)
e. 2nd guitarist= -75 (hard left)
f. Whole drum set (crash cymbals to ride cymbals)= -25 to +25 -12.5 to 12.5 (this is the correct one)

Using ratio and proportion, typical sound stage width is about 40 feet wide. Using a recording software, this whole panning width is 200 panning units. (length of -100 to +100).

Therefore the ratio of panning units to feet is:

200 panning units/ 40 feet = 5 panning units/feet (For a 40 feet sound stage)

To check how realistic is this conversion, we will use the width of the real drum set.

Real drum set needs 5 feet width space when fully set-up. Converting 5 feet to panning units in recording software is about:

5 feet x 5 panning units/feet = 25 panning units, so our panning specifications are correct. This means that for a 40 feet sound stage, to create a real stereo image of drums, it should be panned between -25 to +25 -12.5 to 12.5 (this is the correct specification).

Guitarist are placed +75 to -75 respectively. This means they are both located:

1st guitarist: -75 panning units/ 5 panning units= 15 feet from the left of the vocals.
2nd guitarist: +75 panning units/5 panning units= 15 feet from the right of the vocals.

One important thing to take note on panning are energy level with respect to panning distance. Rule of thumb is that, the lowest frequencies should be pan on the center except for the vocals. And the higher the frequencies, the farther you can place them away from the center. It is because, low frequencies such as bass occupies massive energies and needs to placed at the center for maximum volume.

The following are advantages of proper panning in mixing:
a. Create a real stereo image of an actual live sound stage.
b. Avoid battling the same frequencies in the same location of the stereo image.

By placing the vocals in the center of the mix, means not in conflict in low frequencies and those guitars that occupy the same frequencies as the vocals are placed away from the center. Thus panning improves the clarity of the mix.

NOTICE: TO LEAVE A COMMENT, PLEASE VISIT THE NEW URL OF THIS PAGE: http://www.audiorecording.me/creating-realistic-stereo-image-with-panning.html

Sunday, March 9

Essential Recording Producer and Engineer Skills

So you think you want to be mixing engineer, mastering engineer or producer at home?


As the years go by, I have finally learn the technique to record, mix and master a song production properly using my own personal computer. It may require trial and error on your part but I strongly suggest not to give up and continue to learn.

The pre-requisite for learning are the following:

a. A fast Windows PC, I recommend Pentium 4 or higher.
b. Big RAM ( at least 1 GB)
c. PCI soundcard.
d. Lots of disk space (at least 120 GB).
e. Mixer
f. Headphones.
g. Digital audio workstation (or it is called as digital audio recording software)
h. High end computer audio monitors (speakers), 2.1 recommended.
i. CD writer.

Please read my 13 Important Factors in Computer Audio Recording,to get a complete information of the most important aspects. Then read my tips on buying a mixer for home recording,to get some advice on purchasing mixers for home recording.

And below are the most important skill checklist to develop or acquire as a recording professional (with assignments whether belongs to mixing, mastering engineer and recording producer):

1. Skill to record sound in a computer.- recording/mixing engineer
2. Skill to remove noise from the recordings. -recording/mixing engineer
3. Skill to amplify and normalize audio wave. -recording/mixing engineer
4. Ability to master the preferred digital audio workstation.-recording/mixing engineer
5. Skill to conduct a multi-track recording.-recording/mixing engineer


6. Skill to realistically panned instruments in the stereo field.-recording/mixing engineer
7. Skill to mix instruments in it's optimal frequency location to prevent mud.-recording/mixing engineer
8. Skill to put proper reverbs or ambience of the recording.-recording/mixing engineer
9. Skill to use properly use the compressor to optimize dynamics-recording/mixing engineer
10. Skill to master the use of effects to get professional recording.-recording/mixing engineer
11. Skill to optimize mixing volumes prior to mixdown.-recording/mixing engineer
12. Skill in dithering.-mixing/mastering engineer
13. Skill to detect out of tune instruments.-mixing engineer/mastering engineer/recording producer
14. Ability to adjust mixing console to get the targeted sound (by listening to some reference)-recording/mixing engineer
15. Ability to follow the commercial radio mixing trend.-mixing engineer/recording producer/mastering engineer
16. Ability to detect the central frequency of the most common musical instruments where maximum amplitude occurs.-mixing engineer
17. Ability to produce real drum sounds in the mix.-mixing engineer
18. Skill to initiate the mastering session.-mastering engineer
19. Maximizing the track volumes without distortion-mastering engineer
20. Skill in normalizing volumes- mastering engineer/mixing engineer
21. Skill in produce a CD master for replication-mastering engineer
22. Skill in selecting the best songs for the album- recording producer
23. Ability to detect potential hit songs before releasing the songs- recording producer
24. Ability to manage the entire recording session (from mixing to mastering)-recording producer
25. Ability to arrange the song parts for best results after song production- recording producer
26. Ability to produce successful recordings- recording producer
27. Ability to select the best crew for the recording session- recording producer
28. Ability to select the best artist to represent the material- recording producer
29. Ability to hear what is commercial good and what is crap- recording producer/mixing engineer/mastering engineer.

So many skills, to have all is a blessing. Read this blog and I will share my experiences to develop all the necessary abilities and skills to successfully record, mix and produce a song.

Misty Edwards lyrics and music

Download Music


NOTICE: TO LEAVE A COMMENT, PLEASE VISIT THE NEW URL OF THIS PAGE: http://www.audiorecording.me/essential-recording-producer-and-engineer-skills.html

Tuesday, March 4

Producing drum tracks without a drummer

I have successfully produced drum tracks without a drummer. And the good thing is that the tracks are still playable live with a real drummer. It is just recorded without a drummer. With these type of set-up i get these following benefits:

a. No need to spend long hours in recording studio which translates to big recording budget.
b. No need to argue with a hard headed drummer.
c. No need to risk with out of timing drummer.

Unlike other drum sequencing, I think this produces the best sound. Try to hear one of my produced tracks using this type of drum sequencing method:
("Sure" by Jeanine Maningo)


It is now hard to distinguish the difference in sound between a real drummer and this type of approach. Also, it will be 100% in timing because of the sequencing is software driven.


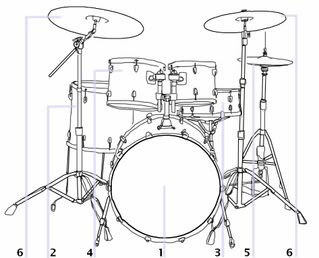
Above are the basic but complete parts of a real drum kit. The important parts are:

1. Kick drum
2. Floor toom
3. Snare
4. Left and Right Mid tom.
5. Open/pedal hi hats.
6. Right (Crash cymbal)
7. Left (Ride cymbal)

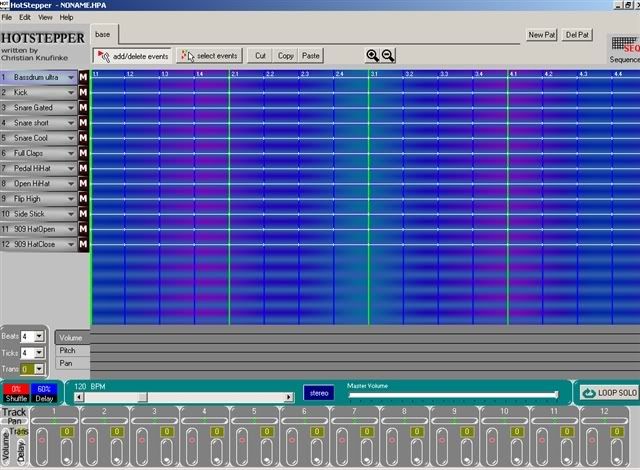
All of this are possible to produce,thanks to the use of Hotstepper Drum Sequencer. This is a freeware courtesy of Christian Knufinke (thanks bro and I will donate for this soon!). I know he is not fully aware of the full potential regarding this open source solution.

Please try to download Hotstepper, so you can try the demonstrations below. To open the archive, you need a RAR software. You can download it here.


Above are the view of a default hotstepper program. To open hotstepper, open the archive and click hotstepper.exe to run the program. You can then see the default drum parts setting:


Hotstepper can play audio in a programmed sequence using it's audio file library of real recorded drum tracks. I have recorded some real drums for you to use. Take note these are real drum sounds beat with real hands not the midi sounds that will produce the common "demo" sound.The respective audio file names in the hotstepper library corresponding the real drum kit parts are:

a. Kick drum- "rock kick.wav"
b. Floor toom- "floor toom.wav"
c. Snare - "tama snare.wav"
d. Left and Right Mid tom."Mid toom.wav"
e. Open hi hat- "Open hi hat.wav"
f. pedal hi hats. - "Pedal hi hat.wav"
g. Right (Crash cymbal)- "Cymbal crash tama"
h. Left (Ride cymbal)- "Ride cymbal.wav"

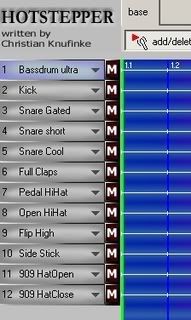
Then change the following default settings to real drum sound mode(the default is midi):

Change default:

1. "Bass drum ultra" at No.1 to "rock kick.wav", you can change by selecting the
arrow down besides the mute "m" symbol.(see screenshot below)
2. "Kick" at No.2 to "floor toom.wav"
3. "Snare gated" at No.3 to "tama snare.wav"
4. "Snare short" to "mid toom.wav"
5. "Snare cool" to "Open hi hat.wav"
6. "Full Claps" to "
Pedal hi hat.wav"
7. "Pedal hi hat" to "Cymbal crash tama"
8. "Open Hi hat" to "Ride Cymbal.wav"

After changing the default to it's proper real drum sound. The sequencer menu should look like this:


On my next post I will illustrate actual examples on sequencing the drums.


NOTICE: TO LEAVE A COMMENT, PLEASE VISIT THE NEW URL OF THIS PAGE: http://www.audiorecording.me/producing-drum-tracks-without-a-drummer.html