THIS PAGE HAS BEEN MOVED HERE:

Saturday, September 27

Tips on how to mix vocals and put some effects like a professional

Vocals is the most important instrument in any audio mixing work. In fact if the vocals are not properly mixed, it will give a serious difference between good and poor audio production work.

Mixing vocals is therefore a big priority in the audio mixing session. In this article, I will share my personal techniques when it comes to mixing vocals. I will illustrate those essential principles I have in mind to come up with a greatly produced vocals.


First Principle: A greatly recorded vocals will make it very easy to professionally produced recorded vocals.

Explanation: Garbage in--> Garbage Out, never dream of having a professionally mix vocals if the recording sounds bad. The problem now centers on your recording skills of vocals. It is why mixing is very different from recording when it comes to technical aspects of music production. When you say high quality recording it says, "it captures the best performance without any noise, interference or clipping"

How do to this? I do this by testing the vocal level first before recording. The objective is to record the vocals at a maximum level without clipping or distortion.. Once you have set the levels, you can now proceed to recording.

It is highly important that recording should be completely raw and without ANY EFFECTS including reverb. Some engineers add reverb only feed to the vocalist headphones to ensure that she feels it LIKE A PRODUCED SOUND, so that she can sing with confidence.

Real recorded vocals from a professional studio is DRY. Without any effects I mean. It is highly important that if the recording is done digitally, it should be recorded above CD quality, this means going above the normal 16 bit 44.1Khz standard. Popular sound cards such as Audiophine by M audio can get 24 bit 96KHz.

Second Principle: Clean up the audio first before using it in the mix

Now the recording is done, open it up using your favorite audio editor (I am using Adobe Audition). Then zoom it out and remove any background noise and unusual breathing related noise. Noise normally occurs in the beginning and in the end. Breathing noise (should sound minor) occurs during the pause of the stanzas , or in the way to the chorus of the song.


You can refer to my past tutorial on tips to remove noise in recordings, regarding this in detail. After noise removal, since there are lost amplitude, you can normalize the wave to bring up the signal to a maximum.

Third Principle: EQ first before Compress

Believe it or not, vocals does not need serious effects like other instruments. The simpler your effects used, the better will be the produced vocals. It is highly important to EQ first using this setting:

Cut 200 Hz (high pass filter)= -6dB
Boost 3000Hz Q = 1 = 3dB
Boost 15000Hz Q = 1 = 3dB

Take note that if you take the summation of cut and boost, it is literally equal to zero, it cut 6dB and I boost 6dB. So only EQ effect overall, the frequency response change , NOT the volume.

For compression, I share some techniques on audio compression tips in mixing that includes vocals. Personally I like the Sony Wavehammer plugin in Adobe audio, presets to voice. It produces some of my finest mixed vocals.

Fourth principle: Be very conservative with reverb

Frankly, the mix vocals I used has a very low amounts of reverb. This could be due to the fact that I am mixing for rock and pop which audible reverb is not very popular unlike in other genre.

But not only that, having low amounts of reverb makes the vocals stood up and sounds very strong (in your face). You can easily captivate the listener with strong vocals with low amounts of reverb. I use Sony ExpressFX Reverb, set to Plate reverbs. Plate reverbs is highly recommended for vocals and only set it:

Room size: 30
Liveliness: 10~15
%Original(dry mixing)= 85%~90%
%Reverb = 15%~10%

Then listen very carefully to the mix and avoid boosting any frequencies of other instruments in the 3000Khz range because it belongs to the vocals. Or else you are facing a muddy mix vocals that ruin the production.

NOTICE: TO LEAVE A COMMENT, PLEASE VISIT THE NEW URL OF THIS PAGE: http://www.audiorecording.me/tips-on-how-to-mix-vocals-and-put-some-effects-like-a-professional.html

Sunday, September 7

How to Maximize Volume in Audio Recording?

There are a lot of ways to increase volume in audio recording, take note the following before you increase volume:

a. Maximizing volume is only done in the mastering process.
b. Maximizing volume in the mixing process is not advisable.
c. It is not only reaching maximum amplitude but by having a well balance mix.

OK.You need to make it loud? In my experience, before you make it loud make it sound pleasant first. This can be done by properly mixing those tracks and keeping it well balanced.

As a rule, it is best to have a maximum amplitude of around -3 dB to -0.5dB during your mix down. This means that after mixing, there should be no peak louder than -0.5dB. The basic reason is to give some space during the mastering process. The mastering process involves the following important processes:

a. Track Trimming and Noise Reduction
b. Equalization
c. Compression

Those 3 major processes affect the quality of your overall tracks particularly equalization and compression process.

Honestly it is the compression process the sets the volume loud. Aside from compression, normalization also makes the sound loud. Normalization is different from compression in a sense that compression makes the track silent parts loud while normalization is not.

Normalization is a fairly easy process, the overall goal of normalization is to attain maximum track volume without compression. This preserves maximum sound quality compared to compression because of the absence of distortion. Compression can distort the tracks if overdo and tend to lose track dynamics. Normalization is a classic technique to make sounds loud and is commonly applied during 60's and 70's. Have you noticed that when you compare Led Zeppelin tracks and Green Day tracks? The Led Zeppelin tracks tend to sound less louder than the Green Day tracks, but sound cleaner and clearer. It is because Led Zeppelin mastering engineers uses less compression and relies more on normalization.

The rest of the techniques illustrated below applies best to mastering process. Although you can individually boost each tracks during mixing but only normalization is recommended not compression. Compression is best done during mastering process.

To do normalization in Adobe Audition 1.5.
1. Using Edit view, highlight the parts of the audio wave you want to normalize.
2. Go to effects---->amplitude
3. Then in constant amplification tab, Find "calculate normalization value" then click "calculate now. This will give the amount of boost in dB needed to reach maximum amplitude of 0dB.
4. Then click OK. It will then normalize the tracks to 0dB.

See screen shot before normalization:


See screen shot after normalization:


See the difference??? Normalization only amplifies the whole wave in such a way no peak will be louder than 0dB.In other words it will not sound as loud as using compression but it sounds absolutely clean.

Below is a screen shot of the same wave using compression:
Tools/Settings: Waves L2 Plug in, -8dB threshold, Out of ceiling= 0dB


By looking at the wave, this maybe the loud sound that you like, but it may distorted at some point in the wave.

If you need more information just click these links,
Easy to use website builder
Menu Of Music
Madman Mike Your Musical Slave-Discover bands musicians djs, music services and more in Michigan


NOTICE: TO LEAVE A COMMENT, PLEASE VISIT THE NEW URL OF THIS PAGE: http://www.audiorecording.me/how-to-maximize-volume-in-audio-recording.html

Sunday, August 10

Developing wide stereo ambiance sound in your recording

Professional sound recording is very easy to spot: it sounds so wide and with great ambiance.Do you think this is a very difficult technique? No, the technique is very easy.Think of live sound recording or a band playing live in front of you. What do you see and feel?


Great and wide ambiance, it is because of these following factors:

a. The stage is set wide compared to a human listener.
b. Stereo speakers are set wide apart (the left and right stereo I mean)
c. If there are two guitarist, having the two guitars playing two guitar will create some delays adding depth to the sound.
d. Reflections causing depths like echo or reverb.

These are the principles of creating wide stereo ambiance in your recording. So how can we do this during the music production process???

The short answer, is to do this right during the recording and mixing process. You cannot make some miracles during mastering process to create depths except widening the stereo but this not as realistic as doing it in the mixing process.

Below are the techniques I used to widen stereo and ambiance:

a. Double recording :

Believe me or not, but double recording is a very effective technique. To do this is to double record in left and right tracks in the stereo field.

For example: I record on the left (panned -50), then again record on the right (panned +50) same track. This will produce doubling effect and the little delay in the notes creates cool ambiance in your recording.

b. Track doubling + Delay

This technique is the artificial version of "Double recording". But this artificial doubling creates reality like double recording. This is applicable if it is not possible to do double recording due to constraint in time and budget at the studio for example.

To do this, is to record only one track then put it in the left first (example panned -50). After that, duplicate that same track using your software (most recording software can do this), and move that duplicated track to the right (panned +50 for example).

It now creates stereo (two mono sound at -50, 50 stereo field but no ambiance yet.

To add some ambiance, you can add delay to one mono track. The delay should be short enough just to add some space, not to create some obvious timing problems when heard by any listener.

c. Reverb mono sources

This is also a great effect to use. This simulates real listening, in which two mono sources are of different distances to the listener. By some doppler principle, it will create some delays in the ear creating ambiance and wide stereo sound.

To do is to have one completely dry track (no effects of reverb), then put it in the left (for example panned -50). Then on the right, place the duplicated track but put some reverbs to it. The reverb must be natural and around 500ms to 1500ms is enough.


d. Chorus and Flanger on mono tracks

This is similar to reverb mono sources, but put some chorus or flanger effect instead of the reverb effect.

Important: Since putting some reverb, chorus or flanger will cause the track to decrease in volume, it is important to have both tracks at highly similar volume for this effect to realistically work or else it will sound mono (one source is stronger than the other).

NOTICE: TO LEAVE A COMMENT, PLEASE VISIT THE NEW URL OF THIS PAGE: http://www.audiorecording.me/developing-wide-stereo-ambiance-sound-in-your-recording.html

Wednesday, July 30

Tips in Mixing Bass Guitar like a PRO

Bass Guitar is very hard to mix. It is always the main reason why the mix sounds either dull, thin or mud. The major problem is that all instruments have bass frequencies, but not so heavy as bass guitar and a kick drum. In a mix, all instruments are played together and the primary problem lies in the bass frequencies, it is why every time you heard tracks that are not mix, it sounds mud.

I have been mixing for years and I love to present these two techniques I learned from experience in mixing. Basically you can only apply one technique per song. But you will have two choices how to approach mixing bass guitar in the mix:

a. The Rock Bass Guitar Sound Mix- in this mix, the objective of the bass guitar is to sound heavy and partly dominant in the mix. As a rock producer, I like the bass guitar to sound aggressive and up front in the mix. Did you notice that once you hear rock tracks today such as Trapt, Green day, Simple Plan, their bass guitar is very dominant? It is a secret of sound engineers in how to make bass guitar loud while avoiding mud.

As a guide, we will designate 45 Hz to 250 Hz as the bass frequencies where kick drums and bass guitar mainly reside. The problem is how to blend those two together.

Since the bass guitar needs to sound heavy and dominant, it should occupy mainly the bottom 45 Hz to 250 Hz. But....

We will dip 100 Hz for the kick drum spikes to shine through. I usually dip the bass guitar around 100 Hz with Q settings of around 2.0 and -9dB reduction.

To balance, I will boost kick drum at around 100 Hz with Q settings of around 2.0 and 9dB~12 boost.

To sound better, I will apply high pass filter (so it will attenuate frequencies lower than 50Hz) on kick drum around 50 Hz -3dB reduction, for the deep bass guitar frequencies to dominate the sub woofer, making it sound heavy.

But I will not apply boosting to bass guitar at any frequencies between 45Hz and 200 Hz.

I finally boost 250 Hz for bass guitar to make those notes more audible, I use Q of 2.0, and boost at 3dB.

As a rule the kick drum needs to be dip at around 250Hz to 400Hz with Q of 2~3, to remove those card board sound, this makes the bass guitar notes more audible as well as the distortion guitar.

What about other instruments??? It is simple. All instruments are to be applied with high pass filter at around 250Hz -6dB reduction. This will make the bass frequencies 45Hz to 250Hz, a place just for bass guitar and kick drums.

What is the result? A heavy bass guitar sound typical for rock music.


b. The Pop Bass Guitar Sound Mix - this is very easy and simple to do. The principle is to avoid heavy bass sound to emphasize clarity, punch and elegance of vocals and guitar instruments. This is mostly applicable in pop music as well as country music.

The Principle:

The kick drum solely occupies the 45 to 150 Hz spectrum, this will make the kick drum sounds so fat and strong very catchy for pop music.

The bass guitar will rest at 200 Hz, it wont produce strong bass but the bass guitar notes is highly audible and it will be there to support the song "groove".

Specifically, the kick drum is boosted 6dB at 80Hz with Q of around 1.0. To prevent heavy muddiness which can affect clarity and airness of pop music, both the kick and bass guitar are applied with high pass filter around 3dB reduction at 50Hz.

Also the bass guitar is applied with high pass filter starting at 200 Hz, so it will attenuate frequencies below 200 Hz, making the sub woofer and the bass frequencies mainly composed of kick sound.

What about other instruments? Again a simple high pass filter will be applied in all, as we do not need their bass frequencies to shine (such as electric guitar, acoustic guitar and vocals). I will set it at 250Hz, so below that frequencies, it will be attenuated.

The result? A very clear and defined mix for bass, ideally for pop and country music.

If you need to hear samples of my work, contact me. Thank you.

NOTICE: TO LEAVE A COMMENT, PLEASE VISIT THE NEW URL OF THIS PAGE: http://www.audiorecording.me/tips-in-mixing-bass-guitar-like-a-pro.html

Sunday, June 29

How to do a multi-track recording session?

Recording multi-track is very efficient. It is because it can saved a lot of energy of re-performing tracks to record. Say the song has only one guitar track. Using multi-track techniques will enable you to continue recording tracks of the guitar without repeating the whole recording process again.

If you want to play the guitar track from intro to the ending of the song without a mistake ,this is fine. But sometimes a mistake could occur when you are playing the guitar somewhere in the chorus. If you are not using multi-track recording techniques,that recording will be deleted and you will have to repeat the intro again. This will make you tired and will make the recording session very inefficient.

This is where multi-track recording sessions are very useful. It can saved you a lot of time and energy. Also there are different multi-track recording softwares available. I am using Adobe Audition 1.5. Frequently updating recording softwares or plug-ins is not recommended as a recording/mixing engineer as you need to fully master your gears (hence spending more time mastering it) to come up with the best quality. What is the use of frequently updating gears that you forget to master it and keep producing crap recordings?

Below are the fundamental steps to do a multi-track recording sessions, this can applied in all types of recording softwares:

1. Start recording the drums.Make it right the first time. Be sure to complete all the drum recordings before proceeding to the next step.

The drum is also the most difficult to record and arranged. The producer should have the idea what the song should sound like from start to ending (at this stage), and the drums should be providing good beats and timing of the song.

2. Start recording the guitars. Guitar recording needs creativity and time.

A WORD OF CAUTION: Thoroughly check the tuning of your guitar before starting the recording.

I heard a lot of noobies rush to recording the guitars only to find out after mastering stage the guitars are severely out of tune!

I really love this stage, because I can be as creative as I need to be. This is the stage where the producer needs to hear great riffs,and guitar licking performance from the guitarist.

Do not still do some panning at this stage, work out to get a clean recording of the guitar (of course noise free).

Some tips: If you are playing the guitar and made a mistake. Shift to another track number and continue recording the rest. This is where multi-track recording is very useful.

3. Record the bass. Bass guitar recordings can be done in DI. Again as a word of caution do not record a bass guitar if it is grossly out of tune. Always check the tuning of the bass guitar before recording it. Same tips with the guitar, do not pan a bass and if you made a mistake, always select another track number next to it and continue recording the rest.

4. Panning stage. Pannned the instruments according to their location in the frequency spectrum. I have written some useful articles in the blog in how to approach panning.In this stage, you will make a duplicate copy of your guitar track and pan them on left and right. Always panned the kick and bass guitar in the center of the stereo image.

5. Pre-mixing stage:In this stage you will start applying EQ and compression to all recording tracks. Your aim is to sound them as clear and strong as possible.

6. Finalize the minus-one: After the pre-mixing stage, the producer will then invite the lead singer or artist to sing or practice the vocal tracks of the song. This is where the producer decides if all tracks matched or good enough to be paired with the vocals. If there are adjustments, the producer can still change the arrangements.

7. Vocal recording stage: This is the stage where the vocals will be recorded. Basic multi-tracking applies but a pro vocalist prefers to perfect the vocal recording in one session only, not cutting it in tracks.

8. Final mixing stage: THis is the final mixing stage where all tracks are mixed for clarity in accordance to the producers request. After the mixing stage, mixdown will be performed and will be submitted for mastering.

NOTICE: TO LEAVE A COMMENT, PLEASE VISIT THE NEW URL OF THIS PAGE: http://www.audiorecording.me/how-to-do-a-multi-track-recording-session.html

Monday, June 9

Remove Noise in Recordings Using 4 Easy Steps

Noise is unwanted in recordings, in fact they do exist and should be removed. Noise in recordings can surely ruin the quality of the mix and decrease the professionalism of the work.

This post covers the noise removal procedure using Adobe Audition 1.5 recording software using Edit View (if you are doing multi-track, clicking those tracks in detail brings you to the edit view of the waveform per track)

Step 1: Identify the portions of the recording where noise is the only signal. Looking below, I have planned to have at least 1 to 3 idle seconds before I start recording , the purpose is to have portions only for the noise.You can see below that the noise is being highlighted in the beginning portions.


You can hear the mp3 equivalent of this "noise + recorded guitar track":


Step 2: Capture this "noise only" section using a noise profile data in Adobe audition.


Step 3:Go to Noise Reduction feature in Adobe Audition 1.5, you should see a very similar window as shown below. You can use my noise reduction settings, it works fine. Take note that in the graph, the green dotted below the yellow lines are the noise signals. It is very important to have a profile that consist of "noise only" signals, to avoid degradation of the true music signal that is being recorded.


Step 4: In the Noise reduction menu, click "Select Entire File", then click OK. This will apply all the settings and processing on the entire wave signals, including the true musical signals that is being recorded.After this noise reduction processing, you can now see that the noise on the beginning portions has been removed.


Listen the guitar track without noise, as you can hear, it sounds clean and pure, no hissing and humming.


NOTICE: TO LEAVE A COMMENT, PLEASE VISIT THE NEW URL OF THIS PAGE: http://www.audiorecording.me/remove-noise-in-recordings-using-4-easy-steps.html

Tuesday, June 3

Rock Vocals and Guitar Reverb Settings:Revealed!

I have been mixing for quite a time already and I admit reverb settings are the most abused effect in mixing. I can hear this quite often in amateur recordings where the instruments are played like in a football stadium or inside the church.

Worst will happen to a rock music with improper use of reverb. It can surely ruin a mix and damage the recording quality of the song. Trends of recording in rock music drastically change over the last 20 years.In 1980's we often hear rock music with deeper reverb such as Outfield and the Police. But reverb settings came down to a minimum starting 1995 above until now.

Today, we can almost hear no reverb in rock music. But there are reverb in it, ordinary listeners will not just notice about it. In this post I can give my reverb settings which I currently use in mixing rock music. I will breakdown it according to the major multi-track components in mixing, these are: vocals, clean guitar and rock distorted guitar. I will make a separate post on the other instruments such as bass and drums.

The settings below are not straightforward solution to all your reverb mixing related problems, use your ear always and remember to fit settings of reverb in the overall mix perspective. Use below as a starting point:


"Vocal Mix Reverb Settings"


I use plate type of reverb from Sony Express FX Reverb. To express it as a percentage with 100% original as zero reverb, I only use 23.6% reverb and the remaining 76.4% the original signal. The room size is also a bit conservative, I use 30% out of a maximum of 100%. The "liveliness" or echo is only 10%.

Most engineers will measure milliseconds for reverb. Unfortunately, I am not using it for vocals and could not give you a conversion. Use your ear to convert.

From the technical point of view, you should put less reverb on vocals so that it will be "up front or on your face" and will enable vocals to dominate the mix. Although there are exceptions to this such as in "grunge", "metal" or "alternative" genre where vocals are buried in the mix.

"Clean Guitar Reverb setting"

Guitar is very important in the rock mix. It is the primary melody instrument so it should also sound up front but not to dominate the vocals for a pop-rock style mix.

I am using Adobe Audition Full Reverb effect and I set it to 1000 ms for reverb length, attack time is 20ms, diffusion is 500ms, perception is 70. And the mixing ratio among dry and reverb is 90 to 10. This means only 10% of the signal is applied with reverb. The remaining is the dry/original signal.

"Rock distorted guitar"


This is a bit tricky,I came out with this type of setting after hearing "So far Away" by Staind. Although I could not match perfectly the reverb setting but for a style of "slowish" not a "speedy" type of song, this setting applies. If your rock song is a speedy just decrease the "decay" in ms by around 50% and your mix will be fine but use your ears!

I use Adobe Audition Studio Reverb Effect when putting reverb on distorted guitars,

Room size= 20, Decay= 3500 ms, Early reflection=0%, Stereo Width=9, High Frequency Cut= 20000Hz, Low frequency cut=500 Hz, Damping= 0%, Diffusion=0%

And for the dry to wet ratio, I set dry signal to around 95% and only 5% for signals with reverb (wet).This is a good technique to give a good punch because of drier signals.

Listen carefully the track below by Jeanine Maningo "Here you are now"

I mix this one using the following reverb settings above:


kelowna accommodation vacation rental-Offers rental vacation in condo located in Playa Del Sol, Kelowna British Columbia.


NOTICE: TO LEAVE A COMMENT, PLEASE VISIT THE NEW URL OF THIS PAGE: http://www.audiorecording.me/rock-vocals-and-guitar-reverb-settingsrevealed.html

Sunday, May 18

Audio Compression Tips for Mixing

Professional Audio Mixing is basically two steps: EQ and Compression. Different instruments require different compression scenario. To those that do not know what is compression. It is all about controlling the peaks of recorded signal.

The easiest way to understand how compression can be useful to a mix is vocals. Vocalist even professionals have tendency to sing very loud in some portions of the song. Now without compression, this vocal track could be very annoying. Compression sets balance by automatically compressing signals when it reaches a certain level.

My major rules in compression is simple, compression takes away signals and sound quality. It is a fact, that if overdo it will drastically reduce the power of the sound.

Now let me give you my tips on compressing common instruments in audio tracks.

Compressing vocals in the mix-----I use the presets of Sony Wave hammer-Voice settings. The characteristics of these compression settings are this:

Attack time- 5 ms
Release time- 50ms
Threshold- -10dB
Compression ratio - 5:1

Take note that attack time is very short, it is because vocals is highly transient in nature, the notes of the vocal is very short, so to capture effective compression in vocals, one must set to short attack time. The release time is a bit slow. It is because when a vocalist sings a loud portions of the song, it will tend to last a longer time also. It is an odd song to have a very short loud portion of the vocals. Threshold of the compressor is the the level of the signal at which compression starts. For vocals, i need it to set to -10dB because more than -10 dB in vocals is already very dominative in mix. The compression ratio is 5:1, this means a five times reduction in the signal when the it reaches -10dB or above. Now thats a bit compression to lower the volume of the loud peaks.

Compressing guitar in the mix : For acoustic and clean electric guitars, I use Sony wave hammer Guitar presets. The compression settings are:

Threshold: -20dB
Ratio: 5.0 is to 1
Attack time: 15ms
Release time: 15ms

The threshold is lower in volume compared to the vocals, the primary reason is that guitars need to sound a bit lower than vocals in the mix or else it will dominate the vocals. Compressing at -20dB ensures that any strong level above it will be suppressed five times to control the volume and not being too loud. Guitar sounds are not sharp transients in nature unlike vocals, kick and snare. It will have a sustaining and delaying sound. So a medium set attack and release time is good.


Compressing bass guitar the mix: Bass guitar sounds needs to be compressed to provide a steady beat backbone to the song. This is very important in modern rock and pop tracks. And because of this, I use Sony wave hammer Bass guitar presets with the following settings:

Threshold= -20dB
Ratio: 6 is to 1
Attack time: 40ms
Release time: 80ms

The main concept of creating a big bass sound, is slow attack and fast release. This is because since bass are not super fast transient it needs to develop it's level first then set compressor to attack the signal and release it immediately, the effect is a loud sounding bass. Compression settings is a bit higher than guitar and vocals, because bass needs to be more uniform in sound to provide a steady beat.

Compressing kick drum in the mix: I do not compress kick drum in the mix because I want to sound real, alive and not compressed. Compressing kick drums in my experience, takes away its deep bass sound so I do not like idea of compressing it.

Compressing snare drums - Snare drums needs compression, so to compress snare I use these settings:

Attack: 20ms
Release: 40ms
Threshold: -12dB
Compression ratio: 5:1

Snare needs to sound natural even though it is sharp transient in nature I prefer to compress snare with a slower attack time and faster release. This will give a full snare and powerful sound. Compressing with too fast attack time can flatten a sound and will make to sound dull.

More sites information,
Piano Scale Music Lessons - Features professional piano playing lessons along with a well-designed, and downloadable piano music scale book of major, minor, and blues scales.

NOTICE: TO LEAVE A COMMENT, PLEASE VISIT THE NEW URL OF THIS PAGE: http://www.audiorecording.me/audio-compression-tips-for-mixing.html

Wednesday, April 9

How to pan drum instruments?

In my recent post "Creating Realistic Stereo Image with Panning",I have mentioned that the whole drum instruments can be panned somewhere -25 to +25 settings.

There is a commenter on the post asking how to pan snare in the drums. In this post I will give my approach on how to pan drum instruments and parts (snares, toms, cymbals and hi hats).

Panning properly drums can create a very realistic drum sound in stereo.


Below are the most important components of a drum kit and it's panning settings:

a. Kick drum - "0", this means it is panned to the center. The reason for this, is that the drum set is placed in the physical center of the stage and kick drum is in the center of the drum set. Below is how the band looks like playing live on the stage and take note the drum set is in the middle.


b. Snare- "+12.5 +6.25 right", this means it is panned very slightly to the right. It is because looking at the real drum, it is located in the physical center between the hi-hats and to the center of the kick drum. Some engineers pan the snare to the center, but I do not recommend this since a significant frequency response of snare can drown the vocals.

c. Pedal hi hat- +25 "+12.5 right", this the farthest right of the drums.

d. Crash cymbal- +18.75 +9.375 right", it is located in the physical center between the snare drum and the hi hat.

e. Toom right - +6.25 "+3.2", again very slightly off center to the right.

f. Toom left -6.25 "-3.2", the pair of the other toom but this one panned to the left.

g. Floor toom- "-12.5" -6.25, panned to the left and located in the physical center of the ride cymbal and the kick drum.

h. Ride cymbal- "-25" -12.5 panned to the left, this is the leftmost part of the drum set.


So stereo drums needs around 8 tracks in the multi-track recording with each of the parts in the different panning settings for realistic stereo placement.

If you do not have real drums but has a recording mixing software, I suggest to read my post about producing real drum tracks without needing real drum kits.. Then try to experiment panning settings for drums as mentioned on this post.


If you have problems in the process, please inform me by commenting on this post. Thank you.

NOTICE: TO LEAVE A COMMENT, PLEASE VISIT THE NEW URL OF THIS PAGE: http://www.audiorecording.me/how-to-pan-drum-instruments.html

Friday, March 28

Ways to Record Sound using a Personal Computer

This is a basic one.Before you can record sound using a personal computer. You need to have:

a. Sound card (decent one at least Soundblaster Audigy)
b. Audio mixer
c. Studio speakers
d. Cables (2)
e. Audio editing software( I am using Adobe audition 1.5)

Read this page for detailed explanation of PC audio recording factors.

Take note there are a lot of ways to record sound. I will show you different configurations and their strength and weaknesses:

Method 1: The most basic configuration


This is very basic, the instruments (could be anything) is plugged into the microphone/line-in input of the soundcard. The audio recording software in the personal computer takes charge in the recording process. And then the soundcard output is connected to the computer speakers for monitoring.

The advantages of this method is that it is very easy to setup. The disadvantages are:
a. Very noisy signal
b. Low amplitude or very weak signal.
c. Poor frequency response.

This is only recommended to record voice signals such as an amateur voice tape recording but this is not recommended for professional recording.

Method 2:
Using mixer on the instruments side:


Instruments can be connected first to the studio mixer thus conditioning the signal such as amplification and removing of noise. This is recommended for studio recording because the signals are now strong to be recorded and less noise.

Plus since the audio mixers are employed, it will have an excellent frequency response which is very essential for professional recording.

Although this method is great but it is not efficient enough as the next step.

Method 3: Using mixer to route all signals coming to it and from the computer.


This is the most efficient one, because all controls of the volume is on the mixer. In this setup, the instruments are feed to the mixer, the mixer then conditions the signal by using it's pre-amp features or some EQ then it is being feed finally to the computer audio recording software.

At the same time the audio recording software feeds out signal to the soundcard which then connects to another input in the mixer to control the volume.The mixer output then connects to the studio monitors/speakers to hear the signals being played. This is a very useful setup during multi-track recording and is the one I am using in my home studio.

Try to experiment other types of setup that fits your budget and your recording needs. But the method 3 is the most recommended method if you are into professional audio CD production.


NOTICE: TO LEAVE A COMMENT, PLEASE VISIT THE NEW URL OF THIS PAGE: http://www.audiorecording.me/ways-to-record-sound-using-a-personal-computer.html

Friday, March 14

Creating Realistic Stereo Image with Panning

Panning is how the instruments are arranged within the stereo image. By properly using this mixing feature can create a very realistic mix. Mixing engineer should mix tracks with a live sound stage/concert stage perspective such as shown below:


Vocals is always in the center because the band lead singer is the star of the show. At the back of the vocals is the bass player. Typically at the back of the bass player is the drummer. The band's two guitarist are on the left and the right. Although, different panning arrangement are possible for additional instruments (such a band with piano or others). But this concept illustrates the basic things on how to do panning in audio mixing to create a very realistic stereo image.

Live sound monitors for vocals and bass are placed up front facing the audience, so that fans can get a great feel of the vocals and the bass groove. On the left and right loud sound monitors are the guitars.

In the commercial audio production and using a recording software, panning can be controlled between -100 to +100. Where mostly -100 is the leftmost part of the stage and +100 is the rightmost part of the stage. Mixing from the real live stage perspective, a mixer can set:

a. Vocals to panning= 0 (center)
b. Kick drums = 0 (center)
c. Bass guitar= 0 (center)
d. 1st guitarist=75 (hard right)
e. 2nd guitarist= -75 (hard left)
f. Whole drum set (crash cymbals to ride cymbals)= -25 to +25 -12.5 to 12.5 (this is the correct one)

Using ratio and proportion, typical sound stage width is about 40 feet wide. Using a recording software, this whole panning width is 200 panning units. (length of -100 to +100).

Therefore the ratio of panning units to feet is:

200 panning units/ 40 feet = 5 panning units/feet (For a 40 feet sound stage)

To check how realistic is this conversion, we will use the width of the real drum set.

Real drum set needs 5 feet width space when fully set-up. Converting 5 feet to panning units in recording software is about:

5 feet x 5 panning units/feet = 25 panning units, so our panning specifications are correct. This means that for a 40 feet sound stage, to create a real stereo image of drums, it should be panned between -25 to +25 -12.5 to 12.5 (this is the correct specification).

Guitarist are placed +75 to -75 respectively. This means they are both located:

1st guitarist: -75 panning units/ 5 panning units= 15 feet from the left of the vocals.
2nd guitarist: +75 panning units/5 panning units= 15 feet from the right of the vocals.

One important thing to take note on panning are energy level with respect to panning distance. Rule of thumb is that, the lowest frequencies should be pan on the center except for the vocals. And the higher the frequencies, the farther you can place them away from the center. It is because, low frequencies such as bass occupies massive energies and needs to placed at the center for maximum volume.

The following are advantages of proper panning in mixing:
a. Create a real stereo image of an actual live sound stage.
b. Avoid battling the same frequencies in the same location of the stereo image.

By placing the vocals in the center of the mix, means not in conflict in low frequencies and those guitars that occupy the same frequencies as the vocals are placed away from the center. Thus panning improves the clarity of the mix.

NOTICE: TO LEAVE A COMMENT, PLEASE VISIT THE NEW URL OF THIS PAGE: http://www.audiorecording.me/creating-realistic-stereo-image-with-panning.html

Sunday, March 9

Essential Recording Producer and Engineer Skills

So you think you want to be mixing engineer, mastering engineer or producer at home?


As the years go by, I have finally learn the technique to record, mix and master a song production properly using my own personal computer. It may require trial and error on your part but I strongly suggest not to give up and continue to learn.

The pre-requisite for learning are the following:

a. A fast Windows PC, I recommend Pentium 4 or higher.
b. Big RAM ( at least 1 GB)
c. PCI soundcard.
d. Lots of disk space (at least 120 GB).
e. Mixer
f. Headphones.
g. Digital audio workstation (or it is called as digital audio recording software)
h. High end computer audio monitors (speakers), 2.1 recommended.
i. CD writer.

Please read my 13 Important Factors in Computer Audio Recording,to get a complete information of the most important aspects. Then read my tips on buying a mixer for home recording,to get some advice on purchasing mixers for home recording.

And below are the most important skill checklist to develop or acquire as a recording professional (with assignments whether belongs to mixing, mastering engineer and recording producer):

1. Skill to record sound in a computer.- recording/mixing engineer
2. Skill to remove noise from the recordings. -recording/mixing engineer
3. Skill to amplify and normalize audio wave. -recording/mixing engineer
4. Ability to master the preferred digital audio workstation.-recording/mixing engineer
5. Skill to conduct a multi-track recording.-recording/mixing engineer


6. Skill to realistically panned instruments in the stereo field.-recording/mixing engineer
7. Skill to mix instruments in it's optimal frequency location to prevent mud.-recording/mixing engineer
8. Skill to put proper reverbs or ambience of the recording.-recording/mixing engineer
9. Skill to use properly use the compressor to optimize dynamics-recording/mixing engineer
10. Skill to master the use of effects to get professional recording.-recording/mixing engineer
11. Skill to optimize mixing volumes prior to mixdown.-recording/mixing engineer
12. Skill in dithering.-mixing/mastering engineer
13. Skill to detect out of tune instruments.-mixing engineer/mastering engineer/recording producer
14. Ability to adjust mixing console to get the targeted sound (by listening to some reference)-recording/mixing engineer
15. Ability to follow the commercial radio mixing trend.-mixing engineer/recording producer/mastering engineer
16. Ability to detect the central frequency of the most common musical instruments where maximum amplitude occurs.-mixing engineer
17. Ability to produce real drum sounds in the mix.-mixing engineer
18. Skill to initiate the mastering session.-mastering engineer
19. Maximizing the track volumes without distortion-mastering engineer
20. Skill in normalizing volumes- mastering engineer/mixing engineer
21. Skill in produce a CD master for replication-mastering engineer
22. Skill in selecting the best songs for the album- recording producer
23. Ability to detect potential hit songs before releasing the songs- recording producer
24. Ability to manage the entire recording session (from mixing to mastering)-recording producer
25. Ability to arrange the song parts for best results after song production- recording producer
26. Ability to produce successful recordings- recording producer
27. Ability to select the best crew for the recording session- recording producer
28. Ability to select the best artist to represent the material- recording producer
29. Ability to hear what is commercial good and what is crap- recording producer/mixing engineer/mastering engineer.

So many skills, to have all is a blessing. Read this blog and I will share my experiences to develop all the necessary abilities and skills to successfully record, mix and produce a song.

Misty Edwards lyrics and music

Download Music


NOTICE: TO LEAVE A COMMENT, PLEASE VISIT THE NEW URL OF THIS PAGE: http://www.audiorecording.me/essential-recording-producer-and-engineer-skills.html

Tuesday, March 4

Producing drum tracks without a drummer

I have successfully produced drum tracks without a drummer. And the good thing is that the tracks are still playable live with a real drummer. It is just recorded without a drummer. With these type of set-up i get these following benefits:

a. No need to spend long hours in recording studio which translates to big recording budget.
b. No need to argue with a hard headed drummer.
c. No need to risk with out of timing drummer.

Unlike other drum sequencing, I think this produces the best sound. Try to hear one of my produced tracks using this type of drum sequencing method:
("Sure" by Jeanine Maningo)


It is now hard to distinguish the difference in sound between a real drummer and this type of approach. Also, it will be 100% in timing because of the sequencing is software driven.


Above are the basic but complete parts of a real drum kit. The important parts are:

1. Kick drum
2. Floor toom
3. Snare
4. Left and Right Mid tom.
5. Open/pedal hi hats.
6. Right (Crash cymbal)
7. Left (Ride cymbal)

All of this are possible to produce,thanks to the use of Hotstepper Drum Sequencer. This is a freeware courtesy of Christian Knufinke (thanks bro and I will donate for this soon!). I know he is not fully aware of the full potential regarding this open source solution.

Please try to download Hotstepper, so you can try the demonstrations below. To open the archive, you need a RAR software. You can download it here.


Above are the view of a default hotstepper program. To open hotstepper, open the archive and click hotstepper.exe to run the program. You can then see the default drum parts setting:


Hotstepper can play audio in a programmed sequence using it's audio file library of real recorded drum tracks. I have recorded some real drums for you to use. Take note these are real drum sounds beat with real hands not the midi sounds that will produce the common "demo" sound.The respective audio file names in the hotstepper library corresponding the real drum kit parts are:

a. Kick drum- "rock kick.wav"
b. Floor toom- "floor toom.wav"
c. Snare - "tama snare.wav"
d. Left and Right Mid tom."Mid toom.wav"
e. Open hi hat- "Open hi hat.wav"
f. pedal hi hats. - "Pedal hi hat.wav"
g. Right (Crash cymbal)- "Cymbal crash tama"
h. Left (Ride cymbal)- "Ride cymbal.wav"

Then change the following default settings to real drum sound mode(the default is midi):

Change default:

1. "Bass drum ultra" at No.1 to "rock kick.wav", you can change by selecting the
arrow down besides the mute "m" symbol.(see screenshot below)
2. "Kick" at No.2 to "floor toom.wav"
3. "Snare gated" at No.3 to "tama snare.wav"
4. "Snare short" to "mid toom.wav"
5. "Snare cool" to "Open hi hat.wav"
6. "Full Claps" to "
Pedal hi hat.wav"
7. "Pedal hi hat" to "Cymbal crash tama"
8. "Open Hi hat" to "Ride Cymbal.wav"

After changing the default to it's proper real drum sound. The sequencer menu should look like this:


On my next post I will illustrate actual examples on sequencing the drums.


NOTICE: TO LEAVE A COMMENT, PLEASE VISIT THE NEW URL OF THIS PAGE: http://www.audiorecording.me/producing-drum-tracks-without-a-drummer.html

Thursday, February 28

How to Mix Instrument Frequencies for Best Sound

Mixing is both an art and science. Why?It is an art because there are no limitations in being creative. It is a science because there are methods to be followed.

Supposing you have completed the recording and panning process. It is the proper time to start mixing the frequencies of the instruments. A song which is not mixed properly can result to poor quality sound recording.

I did myself some educational recording and mixing of my own song "At the highway" (credits: written and produced by Emerson Maningo), initially published on "How to write the hook of the song" at www.make-your-own-song.com.I played and recorded all the instruments (guitar, bass and drums) in multi-track and the vocals are performed by Jeanine Maningo (author: How to become a singer at becomeasinger.blogspot.com). There is no bass guitar involved. Listen to the sound clip below which the frequencies are still not mixed for clarity. (although panning and recording process are done)

This mix does not include the bass guitar mixing as it is being discussed in: tips in mixing bass guitar like a pro. Check this post!


A quick critic to this mix are as follows:
1. Guitars dominating the mix.
2. Muddy guitar sound
3. Kick sounds so weak looks like punching a pail.
5. Vocal lower frequency range in conflict with lower guitar frequencies and kick.

Though this is a demonstration of music production at its simplest form, it has been illustrated, that muddiness of the mix can be corrected at the early part of mixing process and should not be a part of mastering process.

Below is the corrected mix with proper mixing settings applied:


What can you say? Clear is it? Yes I admit it is. The kick and the rest of the instruments are not fighting with each other, so guitar sound is so clear and not conflicting with either the vocals. Overall, the sound is not muddy. The secret in doing this, is very expensive in recording schools. But I will reveal below:

Rule #1.
Each music instruments has it's own center frequencies and range. Use a parametric equalizer to adjust.
and
Rule #2.
Cut and boost conservatively depending on the resulting sound.Q setting of a parametric equalizer is important.

Here we introduce "Q" and parametric equalizer, what are those things?, Q is a measurement of how narrow or wide the frequency adjustment on a parametric equalizer.Parametric equalizer is a mixing tool that will enable you to manipulate frequencies of instruments and balance it in the mix, just like what a paint brush will do to a painter.

To simply understand Q:
a.) a Q of 1.0 could be considered as medium wide.
b.) a Q of less than 1.0 is considered to be wide frequency adjustment.
c.) a Q of 1.4 is average adjustment.
d.) a Q of greater than 2.0 is a narrow adjustment.
Also there is what we call as "shelving". It can be classified as low pass filter or high pass filter. A low pass filter will preserve low frequencies and cut frequencies higher than the cut off.A high pass filter will preserve higher frequencies but cut frequencies lower the cutoff frequency.

A center frequency is a frequency where a maximum amplitude occurs. In layman term, it is a frequency most noticeable by the ear of that instrument. Let say voice frequencies. It is around 300Hz to 3000Hz. It is a pretty wide range, but that is the bandwidth of a telephone line. It is why the telephone lines are optimized for voice transmission.

The center frequencies of that bandwidth is around 1650Hz~2000Hz. It is where the voice frequency is strongest. And during a mixing process, that certain spot in frequency range is reserved for the voice to avoid conflict with other instruments.

Also take note the amplitude adjustment in parametric equalizer are measured in dB (decibels).

Below are the list of common instruments I used to mix "At the highway" and the EQ adjustment:
Short Snare
Freq1: 100Hz, Boost 1dB, Q 1.0
Freq2: 2500Hz, Cut 3dB, Q 1.4
Freq3: 8000Hz, Boost 2dB, Q 1.0

Purpose- 100 Hz serves to fatten the snare sound, cutting at 2500 Hz will minimize conflict with vocal frequencies. Boosting at 8000Hz will add some crisp (audible snare strings)

Kick

Freq1: 75Hz,Boost 6dB,Q 1.0
Freq3: 400Hz, Cut 6dB, Q 1.0
Freq4: 4000Hz, Boost 1dB, Q 0.6

Purpose- Boosting at 75Hz creates super-punch for the kick., Cutting at 400Hz can prevent conflict guitar lower bass and improves kick sound by removing the cardboard like sound. Boosting at 4000Hz can make the kick sound to be heard on small speakers such as headphones.

Guitar

Freq1: 160Hz, high pass filter, Cut 6dB
Freq2: 3000Hz, Cut 9dB, Q 1.0 (Cutting this prevent direct mud sound with vocals which occupies the same frequency range)


NOTICE: TO LEAVE A COMMENT, PLEASE VISIT THE NEW URL OF THIS PAGE: http://www.audiorecording.me/how-to-mix-instrument-frequencies-for-best-sound.html

Wednesday, February 27

Tips on buying a mixer for home recording

Previously, I am recording without a mixer at home and it is just awful. It is because it does not have enough amplification of signals. The signals that were recorded into Adobe audition is very weak and noisy.

But successfully I still managed to do it right, listen to one sample song below:

"Always thinking of you" by Jeanine Maningo


The problem that I am always facing is the difficulty of the recording process. To change instruments, I have to go at the back of the computer and unplug my cable. It is just to risky sometimes I get electrocuted.

For year 2008, I have a new year resolution to buy a simple mixer at home. I surf the net and i found Behringer xenyx 502. I say it is the best mixer for home at the lowest budget while achieving the best quality of sound recording.

I am so contented of my purchase, that I made this tips:

1. Buy the smallest mixer as you can depending on your budget but check the brand. Always go for branded ones, those that already made some reputation in sound engineering industry. When we go to local store we see a lot of mixer, cheap ones but not branded. The sound quality is awful. Just be careful you would not buy a pirated/imitation one.

2. Buy in the city's best recording shop for gears. I buy my behringer xenyx 502 in the city's biggest mall and also sells some branded speakers/monitors like Bose and other stuff.

3. Quality is more important the price itself but not too much. I mean if you can afford and you get the quality you want, then go for it. Just do not exceed on buying the most expensive ones but the quality level is just the same.

4. Check for the number of inputs, Xenyx 502 got 5 inputs (mono), and it is enough for me. The higher the number of inputs the better, but buy only something you need. If you buy many inputs but you use only one most your time. It is wasted.

5. Check for warranty.Make sure your product is protected by warranty in case of early damage.

6. Check for wide applicability. This means, at the same I can use my mixer to:
a. Record sound
b. Record sound while I can monitor (by headphone maybe)
c. Can shift to headphone or to the loud monitor (there is a switch)
d. Has clip detector
e. Has trim function ( gain, very important in recording if you are not using a direct box)
f. Stereo output

7. This means, you should fully understand the manual first before buying anything., to measure it's applicability.

On my next post, I will concentrate on digital audio recording process. Cheers.


NOTICE: TO LEAVE A COMMENT, PLEASE VISIT THE NEW URL OF THIS PAGE: http://www.audiorecording.me/tips-on-buying-a-mixer-for-home-recording.html

Thursday, February 14

13 Important Factors in Computer Audio Recording

As an Electronics engineer/recording professional, I get to know with various gears. I say quality of your audio recording output will affected by this following components:

1. The quality of your Sound card
2. The quality of your Audio Mixer
3. Speed and Size of the Hard disk
4. Speed of your CPU
5. Size of your RAM
6. The clarity and the response of your studio monitors.
7. The noise coming from the connections (wires, etc)
8. The quality of your DAW (Recording software or Digital audio workstation)
9. The quality of your motherboard
10. The quality of your headphone.
11. The optimization of your operating system
12. The acoustics of your room
13. The quality of your CD-drive

Lets discuss this one by one:


1. The quality of your soundcard- before , I attempted to use an onboard soundcard from ASUS-P4P800X. It is a Soundmax Soundcard. Well, I can say it is decent for an onboard soundcard but the quality is hard to accept. Although it helps me produce 7 songs from my catalog, but it takes me a very hard time to record because of these following weaknesses:

a. Extreme noise
b. No amplification of signals inputted to the computer
c. No proper grounding, I get electrocuted anytime I touched the ground surface and the bass/guitar strings.
d. Cannot reproduce bass frequencies very well.

Extreme noise can be handled by a great DAW Adobe Audition 1.5 using the Noise Reduction feature. No proper grounding can be solved by placing your feet on an insulator.

But the most serious problems are: No amplification of signals especially recording bass, and cannot reproduce bass frequencies very well. And these affects the bass tracks of the song. Although, I managed to make the problems less than what they appear in the mixing process. But this type of approach, is not a recommended technique for beginner audio recording/mixing enthusiasts. I am sure it will produce crappy results.
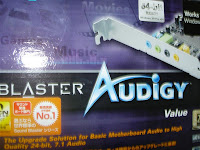
Until now, those problems were solved after I bought Creative Audigy Value Soundcard, a great upgrade for my Soundmax Onboard soundcard. But serious problems can still not be fix by that soundcard alone. It is because the amplification feature of that soundcard is still not strong.

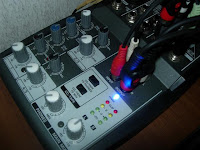
2. The quality of your mixer- Mixer works as to accept input signals for processing and output mixed signals to other audio components such as the soundcard of the personal computer. Well, Creative audigy amplification feature cannot handle the passive bass guitar signal levels because amplitude still too low. I then buy Behringer xenyx 502 mixer. It is very handy and branded. The results are fabulous, I can now record the bass like a pro, the signals were strong and sound is fat. The sound that I am expecting to happen after so many years recording.


3. The speed and size of the hard disk - In the audio recording process, the sound going out from the guitar/any instruments are analog in nature, hard disk cannot store analog data, so the function of the soundcard is to convert analog to digital signals, digital signals are then stored in the hard disk. For a quality recording, I record at 16 bit/44.1 KHz, although others will record at a much higher sampling rate. The type of sound file is WAV which is a very heavy file and consumes a lot of disk space. The sampling rate is also very important to consider when selecting the size of your hard disk. Based on my experience, I have 160 GB of harddisk and when I record at 16 bit/44.1 KHz, it is a very efficient because file sizes are still not big compared to the size of the disk. But the quality are still good. If you have bigger disk, you can record at much higher resolution like 24 bit/ 96 KHz, and this will give a bigger WAV file. The speed of the harddisk is important because during recording and the sound card performs the audio to digital conversion, the disk will store the data by rotating measured in revolutions per minute (RPM). So a slow rotating disk can have problems with recording, and it is recommended to select a faster hard disk such as 7200 RPM range. I used Samsung SP0822N and Seagate ST380011A, all are have rotating speed of 7200 RPM.


4. The speed of your computer CPU- this is very important because CPU is the brain of the personal computer. The faster it is, the more information is processed. The CPU commands the transfer of data from soundcard to hard disk when using what we call as PIO (Programmed input/output) mode. PIO mode stresses the CPU too much that it is not a recommended data transfer mode because transfer of information coming from the soundcard (in digital form) are being passed via the CPU for checking then the CPU will transfer to the disk to save. The most recommended is DMA (Direct memory access), all data transfers from the hard disk will not pass the CPU for checking, this is optimal during recording where analog is being converted to digital then the data will pass from the soundcard to the hard disk.

The quickest way to check when PIO mode is activated is to hear clicks, distortion when audio is being played back. Despite of having a high processor, there were be distorted clicks on the audio. This is a sign that PIO is activated. PIO is not recommended for recording because it will give recording problems such as latency and distortion.

The fastest processor is highly recommended such as the latest Pentium 4 processors.

5. Size of your RAM - RAM is called Random-Access-Memory, one of the most important components in a computer system. It's main role in computer audio recording is like a refrigerator. Without refrigerators in a home, everytime we would like to buy something like food. We have to go to the supermarket and get what we want. It's a long time to go to the supermarket then come back to our home. Instead, having a refrigerator saves time because you just to buy one time and store the food in it. So the next time our stomach needs some food, we will not need to go to the supermarket. We will just open our refrigerator.

RAM functions like that in a computer system, in audio recording, chunks of digital audio data are being routed from hard disk to CPU, instead of quering hard disk all the time. RAM stores the data temporarily, for faster data transfer. So in a computer audio recording, big RAM is much needed. For a typical Pentium 4 system, I recommend a RAM of at least 1GB.

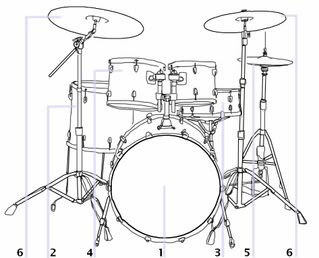
6. The quality and response of your studio monitors - this is very important because studio monitors are gateway to your ears, it is your messenger. In a real life scenario, supposing you are in a battle and you have messenger that is giving you false information. You will surely not win in a battle. The same analogy with recording, if you are mixing a very important song. But you have a studio monitor that cannot reproduce bass sounds (do not have sub-woofer), then you are in a big trouble. I highly recommend, whatever type of studio monitor you use, make sure:


a. It has wide and flat frequency response (around 20Hz to 20,000 Hz)
b. It is a stereo sound system (2.1 is recommended for audio mixing, more than that is just confusing)
c. Has subwoofer dedicated to sub bass.
d. Medium to high power amplifier, can be played loud without distortion or cracking.

7. The noise coming from the connections- there is no perfect recording system, all of it has noise. Noise is unwanted in recording because it will surely destroy your wanted signal. Noise can be further classified as "hum" (low frequency noise, such as 60Hz hum from power lines) or "hiss" (high frequency noise). Although all system has noise, in computer audio recording it is highly suggested to keep it at minimum. It is because, most home recordings do not have the most expensive recording systems that controls noise. The best way to control noise is controlling the connections. Connections are form of wires/transformers that are interconnected with each other. For maximum power transfer condition, these connectors must be matched. And it is highly suggested to use shorter wires as signals will get lost as the wire gets longer. Buy a decent and clean connector free from rust. Rust can contribute heat resistance which converts to noise in audio.

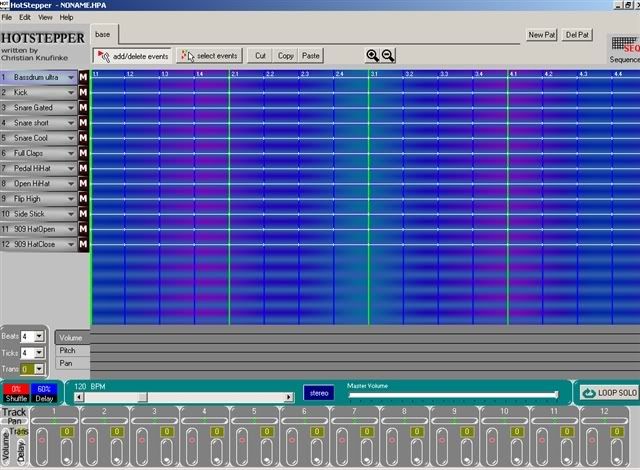
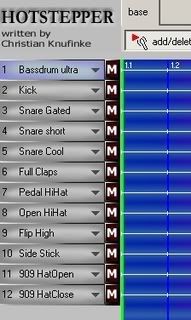
8. The quality of DAW (Digital Audio Workstation) , this is important. Quality DAW can offer a wide recording features to maximize recording quality. Examples are noise reduction features, effects and plug-ins. Cheap DAW, especially the freeware cannot help to improve your recording and mixing. There are many high quality DAW, like Adobe Audition (the one I am using for more than 4 years), Pro tools from Digidesign (industry standard), Cubase (also a good one) , Soundforge/Sony Vega (available with video editing features if you need). Those are the ones I recommend if you want to select a DAW. I highly suggest that you will not shift DAW always. It is good to master one to maximize recording quality. I believe quality recordings is a function of ones ability to handle his DAW. This means that a Cubase expert can produce great recordings than an amateur Protools user. Mastery of your selected digital audio software is the highly important in computer audio recording.

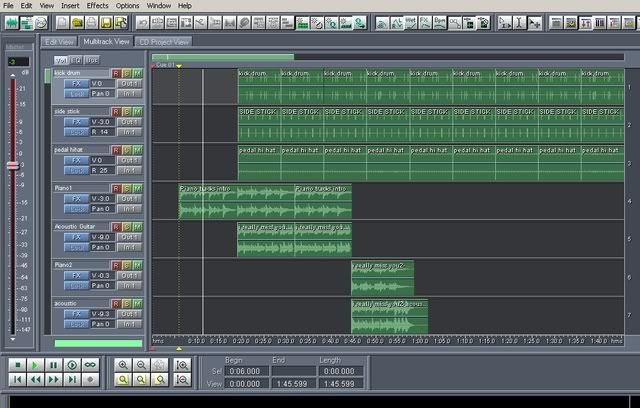
9. The quality of your motherboard - I used the top of the class motherboard at the time (2004) I built my computer. It was Asus P4P800-X. It was far expensive than any class during that time. But I say, it was worth it. P4P800-X has the best onboard soundcard I have tried and helps me to record up to 7 of my best songs! Without even relying on high-end soundcard. Now that I switch to Creative Audigy Value, I even missed the onboard soundcard. But I know I could even produce a better recording with my new gear investment. Powerful motherboards offer so many RAM slots, PCI slots, faster connections (I mean busses). It is analogous to having your components in a very very wide highway. We can drive very fast in a very wide highway without traffic. It is the same with expensive motherboards.

10. The quality of your headphone - although not very important but it you will use this to check the audio during a recording process or review the mix in a headphone. Although it is not recommended to mix using headphones but having a quality headphones makes a difference in quality recording.

11. The optimization of your operating system- this is very critical as the operating system of your computer controls the recording process. If it is not optimized, it will increase the latency of your recording and drop outs in your audio. In my system , I have used Windows XP Service pack 2, and for years it served me well.

I do tweaks on my windows xp computer and here are some few tips to optimize it:
a. Use DMA mode not PIO mode. To check go to control panel, system- hardware-device manager-IDE/ATA controllers-Primary IDE channel-Advanced settings-Current transfer mode.

Current transfer mode should be DMA.

b. Defrag computer once a month. Defragmentation process, will make the fragmented files closer to each other in a hard disk space, thus faster to be accessed.

b. Optimize for background services, Audio drivers runs in the background. And to do this, Control panel-Device manager-system-advanced-performance-advance-processor scheduling -background services.

c. Optimize for best performance- To do this , go to control panel-device manager-system-advance-settings-visual effects-adjust for best performance. In this type of optimization. Windows XP will not display the flashy colors, animations thus helping to save it for audio usage.

d. Optimize the virtual memory- set it to system managed.

e. Clean files regularly to optimize hard disk space.

12.
The acoustics of your room - of course it matters, although we cannot afford a world class acoustics. But in my experience, I learn the acoustics in my room by closely studying the frequency response of it. I do it by listening to a professional mixed CD in my room, hear the bass levels, treble levels, mid frequencies. How is it responding to your ear is important. Then go to your mix and matched to that level. By knowing the acoustics of your room, it will help you create a good mix. The most important is that, give some time to know the acoustics of your room by listening to a professionally mixed CD and compare it to your mix.

13.
The quality of your CD-drive - many would say, this is not so important. Yes it is. But take note that during a mastering process , wherein a mastered track will be burned down to CD audio, this will use the CD drive. If your CD drive is not optimized for audio, then you will have problems. The best quality CD drive for mastering/computer audio recording applications requires a very slow burning speed of around 1x to 4x. It is because the slower your burning speed, the higher accurate it is. The faster the burning speed, the more prone to errors. It is why master CD to be submitted for replication needs to be burned at a slow rate to prevent digital errors during CD replication.


NOTICE: TO LEAVE A COMMENT, PLEASE VISIT THE NEW URL OF THIS PAGE: http://www.audiorecording.me/13-important-factors-in-computer-audio-recording.html