Recording multi-track is very efficient. It is because it can saved a lot of energy of re-performing tracks to record. Say the song has only one guitar track. Using multi-track techniques will enable you to continue recording tracks of the guitar without repeating the whole recording process again.
If you want to play the guitar track from intro to the ending of the song without a mistake ,this is fine. But sometimes a mistake could occur when you are playing the guitar somewhere in the chorus. If you are not using multi-track recording techniques,that recording will be deleted and you will have to repeat the intro again. This will make you tired and will make the recording session very inefficient.
This is where multi-track recording sessions are very useful. It can saved you a lot of time and energy. Also there are different multi-track recording softwares available. I am using Adobe Audition 1.5. Frequently updating recording softwares or plug-ins is not recommended as a recording/mixing engineer as you need to fully master your gears (hence spending more time mastering it) to come up with the best quality. What is the use of frequently updating gears that you forget to master it and keep producing crap recordings?
Below are the fundamental steps to do a multi-track recording sessions, this can applied in all types of recording softwares:
1. Start recording the drums.Make it right the first time. Be sure to complete all the drum recordings before proceeding to the next step.
The drum is also the most difficult to record and arranged. The producer should have the idea what the song should sound like from start to ending (at this stage), and the drums should be providing good beats and timing of the song.
2. Start recording the guitars. Guitar recording needs creativity and time.
A WORD OF CAUTION: Thoroughly check the tuning of your guitar before starting the recording.
I heard a lot of noobies rush to recording the guitars only to find out after mastering stage the guitars are severely out of tune!
I really love this stage, because I can be as creative as I need to be. This is the stage where the producer needs to hear great riffs,and guitar licking performance from the guitarist.
Do not still do some panning at this stage, work out to get a clean recording of the guitar (of course noise free).
Some tips: If you are playing the guitar and made a mistake. Shift to another track number and continue recording the rest. This is where multi-track recording is very useful.
3. Record the bass. Bass guitar recordings can be done in DI. Again as a word of caution do not record a bass guitar if it is grossly out of tune. Always check the tuning of the bass guitar before recording it. Same tips with the guitar, do not pan a bass and if you made a mistake, always select another track number next to it and continue recording the rest.
4. Panning stage. Pannned the instruments according to their location in the frequency spectrum. I have written some useful articles in the blog in how to approach panning.In this stage, you will make a duplicate copy of your guitar track and pan them on left and right. Always panned the kick and bass guitar in the center of the stereo image.
5. Pre-mixing stage:In this stage you will start applying EQ and compression to all recording tracks. Your aim is to sound them as clear and strong as possible.
6. Finalize the minus-one: After the pre-mixing stage, the producer will then invite the lead singer or artist to sing or practice the vocal tracks of the song. This is where the producer decides if all tracks matched or good enough to be paired with the vocals. If there are adjustments, the producer can still change the arrangements.
7. Vocal recording stage: This is the stage where the vocals will be recorded. Basic multi-tracking applies but a pro vocalist prefers to perfect the vocal recording in one session only, not cutting it in tracks.
8. Final mixing stage: THis is the final mixing stage where all tracks are mixed for clarity in accordance to the producers request. After the mixing stage, mixdown will be performed and will be submitted for mastering.
NOTICE: TO LEAVE A COMMENT, PLEASE VISIT THE NEW URL OF THIS PAGE: http://www.audiorecording.me/how-to-do-a-multi-track-recording-session.html
Sunday, June 29
Monday, June 9
Remove Noise in Recordings Using 4 Easy Steps
Noise is unwanted in recordings, in fact they do exist and should be removed. Noise in recordings can surely ruin the quality of the mix and decrease the professionalism of the work.
This post covers the noise removal procedure using Adobe Audition 1.5 recording software using Edit View (if you are doing multi-track, clicking those tracks in detail brings you to the edit view of the waveform per track)
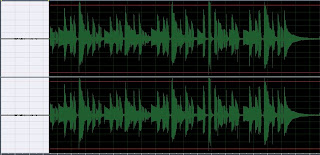
Step 1: Identify the portions of the recording where noise is the only signal. Looking below, I have planned to have at least 1 to 3 idle seconds before I start recording , the purpose is to have portions only for the noise.You can see below that the noise is being highlighted in the beginning portions.
You can hear the mp3 equivalent of this "noise + recorded guitar track":
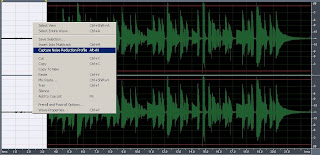
Step 2: Capture this "noise only" section using a noise profile data in Adobe audition.
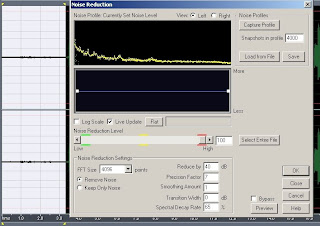
Step 3:Go to Noise Reduction feature in Adobe Audition 1.5, you should see a very similar window as shown below. You can use my noise reduction settings, it works fine. Take note that in the graph, the green dotted below the yellow lines are the noise signals. It is very important to have a profile that consist of "noise only" signals, to avoid degradation of the true music signal that is being recorded.
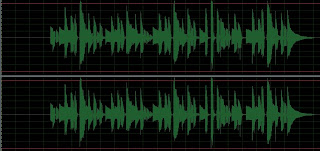
Step 4: In the Noise reduction menu, click "Select Entire File", then click OK. This will apply all the settings and processing on the entire wave signals, including the true musical signals that is being recorded.After this noise reduction processing, you can now see that the noise on the beginning portions has been removed.
Listen the guitar track without noise, as you can hear, it sounds clean and pure, no hissing and humming.
NOTICE: TO LEAVE A COMMENT, PLEASE VISIT THE NEW URL OF THIS PAGE: http://www.audiorecording.me/remove-noise-in-recordings-using-4-easy-steps.html
This post covers the noise removal procedure using Adobe Audition 1.5 recording software using Edit View (if you are doing multi-track, clicking those tracks in detail brings you to the edit view of the waveform per track)
Step 1: Identify the portions of the recording where noise is the only signal. Looking below, I have planned to have at least 1 to 3 idle seconds before I start recording , the purpose is to have portions only for the noise.You can see below that the noise is being highlighted in the beginning portions.

You can hear the mp3 equivalent of this "noise + recorded guitar track":
Step 2: Capture this "noise only" section using a noise profile data in Adobe audition.

Step 3:Go to Noise Reduction feature in Adobe Audition 1.5, you should see a very similar window as shown below. You can use my noise reduction settings, it works fine. Take note that in the graph, the green dotted below the yellow lines are the noise signals. It is very important to have a profile that consist of "noise only" signals, to avoid degradation of the true music signal that is being recorded.

Step 4: In the Noise reduction menu, click "Select Entire File", then click OK. This will apply all the settings and processing on the entire wave signals, including the true musical signals that is being recorded.After this noise reduction processing, you can now see that the noise on the beginning portions has been removed.

Listen the guitar track without noise, as you can hear, it sounds clean and pure, no hissing and humming.
NOTICE: TO LEAVE A COMMENT, PLEASE VISIT THE NEW URL OF THIS PAGE: http://www.audiorecording.me/remove-noise-in-recordings-using-4-easy-steps.html
Tuesday, June 3
Rock Vocals and Guitar Reverb Settings:Revealed!
I have been mixing for quite a time already and I admit reverb settings are the most abused effect in mixing. I can hear this quite often in amateur recordings where the instruments are played like in a football stadium or inside the church.
Worst will happen to a rock music with improper use of reverb. It can surely ruin a mix and damage the recording quality of the song. Trends of recording in rock music drastically change over the last 20 years.In 1980's we often hear rock music with deeper reverb such as Outfield and the Police. But reverb settings came down to a minimum starting 1995 above until now.
Today, we can almost hear no reverb in rock music. But there are reverb in it, ordinary listeners will not just notice about it. In this post I can give my reverb settings which I currently use in mixing rock music. I will breakdown it according to the major multi-track components in mixing, these are: vocals, clean guitar and rock distorted guitar. I will make a separate post on the other instruments such as bass and drums.
The settings below are not straightforward solution to all your reverb mixing related problems, use your ear always and remember to fit settings of reverb in the overall mix perspective. Use below as a starting point:
"Vocal Mix Reverb Settings"
I use plate type of reverb from Sony Express FX Reverb. To express it as a percentage with 100% original as zero reverb, I only use 23.6% reverb and the remaining 76.4% the original signal. The room size is also a bit conservative, I use 30% out of a maximum of 100%. The "liveliness" or echo is only 10%.
Most engineers will measure milliseconds for reverb. Unfortunately, I am not using it for vocals and could not give you a conversion. Use your ear to convert.
From the technical point of view, you should put less reverb on vocals so that it will be "up front or on your face" and will enable vocals to dominate the mix. Although there are exceptions to this such as in "grunge", "metal" or "alternative" genre where vocals are buried in the mix.
"Clean Guitar Reverb setting"
Guitar is very important in the rock mix. It is the primary melody instrument so it should also sound up front but not to dominate the vocals for a pop-rock style mix.
I am using Adobe Audition Full Reverb effect and I set it to 1000 ms for reverb length, attack time is 20ms, diffusion is 500ms, perception is 70. And the mixing ratio among dry and reverb is 90 to 10. This means only 10% of the signal is applied with reverb. The remaining is the dry/original signal.
"Rock distorted guitar"
This is a bit tricky,I came out with this type of setting after hearing "So far Away" by Staind. Although I could not match perfectly the reverb setting but for a style of "slowish" not a "speedy" type of song, this setting applies. If your rock song is a speedy just decrease the "decay" in ms by around 50% and your mix will be fine but use your ears!
I use Adobe Audition Studio Reverb Effect when putting reverb on distorted guitars,
Room size= 20, Decay= 3500 ms, Early reflection=0%, Stereo Width=9, High Frequency Cut= 20000Hz, Low frequency cut=500 Hz, Damping= 0%, Diffusion=0%
And for the dry to wet ratio, I set dry signal to around 95% and only 5% for signals with reverb (wet).This is a good technique to give a good punch because of drier signals.
Listen carefully the track below by Jeanine Maningo "Here you are now"
I mix this one using the following reverb settings above:
NOTICE: TO LEAVE A COMMENT, PLEASE VISIT THE NEW URL OF THIS PAGE: http://www.audiorecording.me/rock-vocals-and-guitar-reverb-settingsrevealed.html
Worst will happen to a rock music with improper use of reverb. It can surely ruin a mix and damage the recording quality of the song. Trends of recording in rock music drastically change over the last 20 years.In 1980's we often hear rock music with deeper reverb such as Outfield and the Police. But reverb settings came down to a minimum starting 1995 above until now.
Today, we can almost hear no reverb in rock music. But there are reverb in it, ordinary listeners will not just notice about it. In this post I can give my reverb settings which I currently use in mixing rock music. I will breakdown it according to the major multi-track components in mixing, these are: vocals, clean guitar and rock distorted guitar. I will make a separate post on the other instruments such as bass and drums.
The settings below are not straightforward solution to all your reverb mixing related problems, use your ear always and remember to fit settings of reverb in the overall mix perspective. Use below as a starting point:
"Vocal Mix Reverb Settings"
I use plate type of reverb from Sony Express FX Reverb. To express it as a percentage with 100% original as zero reverb, I only use 23.6% reverb and the remaining 76.4% the original signal. The room size is also a bit conservative, I use 30% out of a maximum of 100%. The "liveliness" or echo is only 10%.
Most engineers will measure milliseconds for reverb. Unfortunately, I am not using it for vocals and could not give you a conversion. Use your ear to convert.
From the technical point of view, you should put less reverb on vocals so that it will be "up front or on your face" and will enable vocals to dominate the mix. Although there are exceptions to this such as in "grunge", "metal" or "alternative" genre where vocals are buried in the mix.
"Clean Guitar Reverb setting"
Guitar is very important in the rock mix. It is the primary melody instrument so it should also sound up front but not to dominate the vocals for a pop-rock style mix.
I am using Adobe Audition Full Reverb effect and I set it to 1000 ms for reverb length, attack time is 20ms, diffusion is 500ms, perception is 70. And the mixing ratio among dry and reverb is 90 to 10. This means only 10% of the signal is applied with reverb. The remaining is the dry/original signal.
"Rock distorted guitar"
This is a bit tricky,I came out with this type of setting after hearing "So far Away" by Staind. Although I could not match perfectly the reverb setting but for a style of "slowish" not a "speedy" type of song, this setting applies. If your rock song is a speedy just decrease the "decay" in ms by around 50% and your mix will be fine but use your ears!
I use Adobe Audition Studio Reverb Effect when putting reverb on distorted guitars,
Room size= 20, Decay= 3500 ms, Early reflection=0%, Stereo Width=9, High Frequency Cut= 20000Hz, Low frequency cut=500 Hz, Damping= 0%, Diffusion=0%
And for the dry to wet ratio, I set dry signal to around 95% and only 5% for signals with reverb (wet).This is a good technique to give a good punch because of drier signals.
Listen carefully the track below by Jeanine Maningo "Here you are now"
I mix this one using the following reverb settings above:
kelowna accommodation vacation rental-Offers rental vacation in condo located in Playa Del Sol, Kelowna British Columbia.
NOTICE: TO LEAVE A COMMENT, PLEASE VISIT THE NEW URL OF THIS PAGE: http://www.audiorecording.me/rock-vocals-and-guitar-reverb-settingsrevealed.html
Subscribe to:
Posts (Atom)
